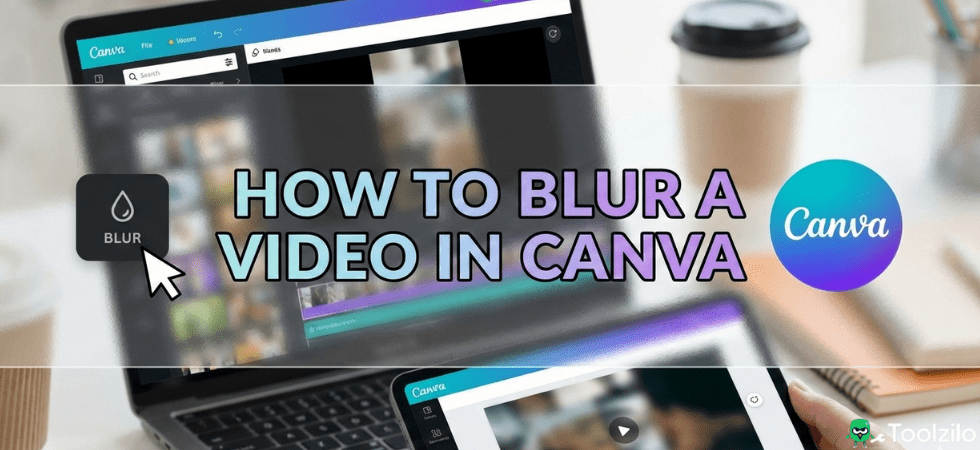
Whether you need to obscure sensitive information, hide a license plate, or simply create a depth-of-field effect, knowing how to blur a video in canva is an essential skill for content creators. While Canva is primarily known for graphic design, its video editing capabilities have expanded significantly, allowing users to apply professional effects without complex software.
Blurring footage can dramatically improve the aesthetic of your content or protect the privacy of subjects in your clips. However, unlike advanced editors like Adobe Premiere Pro, Canva requires specific workarounds for different types of blurring. This guide breaks down the exact methods to blur backgrounds, faces, and entire clips effectively.
Can You Blur a Video on Canva?
Yes, you can blur a video on canva, but the method changes based on what you are trying to achieve. If you want to blur the entire footage for a background overlay, the process is straightforward using the built-in “Adjust” or “Effects” tools.
However, if your goal is to obscure a moving face or a specific object, the process is more manual. Canva does not currently offer automated motion-tracking blur for video. To achieve this, you will need to use overlay elements or layer duplication techniques. Understanding these limitations is key to managing your workflow efficiently.
How to Blur the Entire Video
Blurring an entire video is often used when you want to place text over a clip and ensure it remains readable. This technique is popular for social media stories, reels, and website headers.
Here is the quickest way to blur video canva style:
- Upload and Select: Upload your video to the editor and click on it to select it.
- Open Edit Video: Click the “Edit video” button on the top toolbar.
- Use the Blur Slider: Navigate to the “Adjust” tab. Scroll down to the “Texture” or “Blur” section.
- Adjust Intensity: Drag the slider to the right to increase the blur intensity until you reach your desired look.
This method affects every pixel in the frame and remains static throughout the duration of the clip.
How to Blur Video Background in Canva
Creating a professional “bokeh” or portrait mode effect on video is a great way to make your subject pop. Since Canva doesn’t have a one-click “portrait mode” for video files yet, you can achieve this by learning how to blur video background in canva using a layering trick.
This method requires a Canva Pro account because it utilizes the Background Remover tool.
- Place Your Video: Drag your video onto the canvas and set it as the background or size it to fill the screen.
- Duplicate the Video: Select the video, press
Ctrl + D(orCmd + Don Mac) to duplicate it. You now have two identical videos perfectly aligned on top of each other. - Remove Background (Top Layer): Select the top video layer. Go to “Edit video” and click “Background Remover.” Wait for the AI to process. You now have your subject isolated on the top layer.
- Blur the Bottom Layer: Select the bottom video layer (the one behind the subject). Go to “Edit video” > “Adjust” and increase the Blur slider.
The result is a sharp subject in the foreground with a soft, blurred background in the rear. This is the most effective way to handle how to blur background in canva video projects.
How to Blur Part of a Video in Canva
If you are trying to figure out how to blur part of a video in canva—such as a face, a brand logo, or a car license plate—you will need to use a graphical overlay. This is because you cannot selectively blur pixels on a single video layer without affecting the whole frame.
Steps on how to blur a video in canva for specific objects
- Identify the Object: Play your video and pause at the moment the sensitive information or face appears.
- Select a Blur Element: Go to the “Elements” tab on the left sidebar. Search for “Blur.” Select a graphic that looks like a fuzzy circle or square. You can also search for “Blurry circle.”
- Position the Element: Drag the blur graphic over the face or object you want to hide.
- Adjust Colors: If the blur element is colored, change it to match the surrounding video colors or set it to white/grey and adjust the transparency for a natural look.
- manage Timing: Right-click the blur element and select “Show Timing.” Adjust the purple timeline bar so the blur only appears when the object is on screen.
If the object moves, you will need to use Canva’s animation feature. Click the blur element, select “Animate,” and choose “Create an Animation” (the bee icon). Drag the blur element along the path the object travels. This allows you to essentially “track” the object manually.
How to Blur Video in Canva Mobile
Many creators edit directly from their phones. If you are wondering how to blur video in canva mobile, the interface is slightly different but the capabilities are largely the same.
- Open the Canva app and load your project.
- Tap on the video clip you want to edit.
- Scroll through the bottom toolbar and tap “Effects” or “Adjust.”
- Find the “Blur” option under the Adjust menu.
- Use your finger to slide the toggle to the right.
To blur specific areas on mobile, tap the purple “+” button, go to Elements, search for “Blur,” and place it over your video manually using the touchscreen.
Frequently Asked Questions
Can I blur a moving face in Canva video?
Yes, by using a blur graphic overlay and the “Create an Animation” tool to follow the movement.
Is there a one-click background blur for video in Canva?
No, you must duplicate the video layer and use the Background Remover on the top layer.
How do I unblur a video in Canva?
Select the video, go to “Adjust,” and move the Blur slider back to zero.
Can I blur only the edges of a video in Canva?
Yes, search for “vignette” or “blurred edge” in the Elements tab and place it over your video.
Is the video background remover free?
No, the video background remover feature requires a Canva Pro subscription.
Does blurring a video reduce its quality?
Blurring intentionally reduces detail, but the export resolution remains the same as your project settings.